2014年10月7日 星期二

FortiGate雙WAN設定

摘錄自 Shunze 學園 《分享》FortiGate的雙Wan設定

今天有機會在公司的FortiGate上做了雙WAN設定,
原本以為很簡單,很單純,把ISP提供的IP設定好就好?

結果事情沒有傻蛋想的單純...
Wan2是通了,主要流量也從新的Wan2對外聯絡,
但原本Wan1上設定的虛擬IP全部無法提供服務。


設定的重點在於Wan1與Wan2均要提供服務,
所以distance兩著要設定相同的值。

但又希望主要透過Wan2對外?
所以Wan2的優先權要高於Wan1(數字小優先)。

在這樣的設定下,Wan2就會是內網對外的主要通道,
且Wan1的虛擬IP也可正常運作。


但若把distance做了大小不同數值的調整,
那麼優權先低(數字大的)將永遠取不到連通機會。
即使在政策路由中進行了各種設定也沒用!
(所以Wan1上的服務一直不通...)

Fortigate 雙 WAN (負載平衡)備援之一 (檢測機制)

摘錄自 Shunze 學園 專線連通與否之判斷機制
若兩端間的專線是透過一條直通的網路線來連接,
那麼在防火牆上就可以略過“偵測連通與否”的判斷機制。


因為只要任一端網路線拔除,就會造成防火網介面的unplug狀態,而切換到另一條專線。


但實際上在申裝專線時,都是透過ISP業者的機房來串接,
中間經過了幾個機房?又有多少個節點沒人知道。


其中任何一個節點斷線,也不會造成防火牆介面上的unplug狀態。
在這種狀態下,如何確認專線是否連通?
最簡單也最直覺的,就是ping專線另一端的端點。

因此於此架構下,專線介接的port需開放ping的功能,讓專線的另一端能進行偵測;
而防火牆也要設定偵測機制,以確認專線是否連通。


↑Cyberoam的偵測機制


↑FortiGate的偵測機制

___________________________________________________________________________

3 WAN的FortiGate能否設定成跟Cyberoam一樣?
在上述設定範例中,FortiGate 80C只有兩個WAN,
所以無法透過第三個WAN介面提供內對外的網路存取。

但若有3 WAN的FortiGate防火牆,那麼是否可以跟Cyberoam一樣,
二個WAN做專線failover,剩下的一個WAN設定為內對外的需求?


雖然順子沒有3 WAN的FortiGate可供測試,
不過就邏輯來看,要達成這架構絕對沒有問題!
最主要修改的部分,就是“靜態路由”。

WAN1與WAN2的靜態路由要縮小範圍為192.168.128.0/255.255.252.0。
然後再把預設路由0.0.0.0/0.0.0.0指定給WAN3。

這樣要去192.168.128.0/255.255.252.0網段的封包就會透過WAN1/WAN2來繞接;
而要去其它外網的封包,就會透過預設路由WAN3來傳導。

Fortigate 雙 WAN (負載平衡)備援之一

摘錄自Shunze 學園《分享》雙專線備援之防火牆設定Cyberom&FortiGate
設定目標
以Cyberoam與FortiGate兩種不同廠牌的防火牆透過雙專線之串接,
來達成兩個網段連通之failover機制。
當主要連接線路不通時,能夠自動切換到備援線路,維持兩個網段的連通。


設定的要點在於 “雙專線的權重配置” 與 “專線連通與否” 的偵測。


Cyberoam端
雙專線的failover在Cyberoam上,需透過WAN的主要/備援路由自動切換來達成。
為了能夠判斷專線的連通與否,WAN port需啟用ping讓另一端的防火牆能夠借由ping來偵測連線狀態。


第一步先設定Cyberoam上的G port為WAN及其IP設定。


再來設定Cyberoam上的H port為WAN及IP設定。


因為網段內有其自己原來對外的主要WAN通道port D,
所以除了port D的閘道器類型設為啟動外,G/H Port的閘道器類型就設定為備份;
讓default route能指向port D。


接著透過LAN對WAN的防火牆規則設定,將Cyberoam to FortiGate的網段的規則定義清楚。

↑由於兩端網路內電腦IP要直通,不透過NAT轉換,所要取消套用NAT的選項。

雙專線的優先順序則在規則中的閘道器的部份來定義,
設定為主要透過G Port來連通,H Port為備援。


而LAN對其它預設外網則透過D port連接。

↑內部虛擬IP無法直接對外,所要要勾選NAT的選項。這與專線IP直通有意義上的不同。


↑預設外網則透過D port連通。

設定完後,LAN對WAN可以清楚看到兩筆不同規則。

LAN端到FortiGate端10.36.98.0/24會透過規則A_to_W_Uni經由Port G與H來連通;
而LAN端到其它外網則透過規則A_to_W經由Port D來連通。


FortiGate端
雙專線的failover在ForiGate 80C上,同樣可透過雙WAN的設定來達成。
但由於FortiGate 80C上只有兩個WAN port,將兩個WAN Port拿來做專線fail over後,
FortiGate端就不再有對外連通的port了。
要對外連通,需透過其它防火牆並設定路由導向才能辦到。

首先,先設定FortiGate上WAN1的IP設定。

↑為了能夠判斷專線的連通與否,WAN port需啟用ping讓另一端的Cyberoam能夠借由ping來偵測連通與否。

再來設定FortiGate上WAN2的IP設定。

↑同樣需開啟ping讓另一端的Cyberoam能夠判斷連通與否。


而兩個WAN port的優先權重,則可到路由設定的靜態路由中來設置不同的優先權重來區別。

↑WAN1設定為0,做為主要路由。


↑WAN2設定為100,做為備援路由。


而線路是否連通則可在靜態路由中的“設定”來設定偵測機制。
WAN1的部分透過ping的通訊協定每2秒對專線另一端Cyberoam的G Port IP 192.168.12.33來進行偵測。


WAN2的部分,同樣透過ping來測偵專線另一端Cyberoam的H Port IP 192.168.12.37是否連通。


最後到規則中的防火牆策略來設定LAN對WAN1/WAN2及WAN1/WAN2到LAN的放行規則。

↑由於兩端網路內電腦IP要直通,不透過NAT轉換,所要取消套用NAT的選項。

設定完成後,可在規則中看到LAN對WAN1/WAN2及WAN1/WAN2到LAN共四條規則。


FailOver驗證
雙專線的failover驗證可透過FortiGate路由設定中的即時路由來查看。

在主要專線暢通,雙方都ping的到對方的情況下,
可以看到0.0.0.0/0主要路由是透過WAN1與192.168.12.33來連通。


一旦主要專線出現異常,雙方ping不到的情況發生,
就會主動切換到備援專線,透過WAN2與192.168.12.37來連通。

2014年8月22日 星期五

MAC 加入網域

extracted from  http://blog.pluralsight.com/join-mac-to-windows-domain

How to Join a Mac to a Windows Domain

By 

Tell me if this sounds familiar. You come into work one day and your boss calls you into his office and says he got a new laptop. You arrive at his office door and realize your boss bought a Mac. He wants to be able to access all the company files stored on your Windows domain from his new Mac. Or maybe the scenario is a bit different. Your company decides to create a new department for graphical design and marketing and all the designers use Macs.
So what do you do? Not to worry, you can join a Mac to your Windows domain and today I’m going to show you how it’s done. Let’s walk through joining Snow Leopard to a Windows Server 2008 domain.

Setting Network and User Options on a Mac

Windows domains rely on DNS for Active Directory to work correctly so the first thing we need to do is set a static DNS address on your Mac. We need to use the IP address of your Windows domain controller for this setting. From your dock open System Preferences or click the Apple in the top left corner and choose System Preferences. Now click Network to open your network settings.

Now you should be at your Network settings screen.

 
By default your network adapter is set to DHCP. Depending on the network connection you are going to use you will need to change this setting toManually.
Keep in mind if you are setting a static address on your Mac and you take it to another network you might need to change this setting back to DHCP. I would suggest using the wired or Ethernet connection for your static address and use the wireless for DHCP. In this example I am setting a static address on the Ethernet connection.
My Windows domain controller has an IP address of 192.168.1.172 so I will put this in the DNS section. I’m setting my IP address to 192.168.1.171 for this example. Fill in your IP address, subnet, gateway, and DNS according to your network settings.
 
Click the back button to go back to System Preferences and chooseAccounts


Click the Lock to make changes to these settings. Then click the Join button next to Network Account Server


Now click the Open Directory Utility button

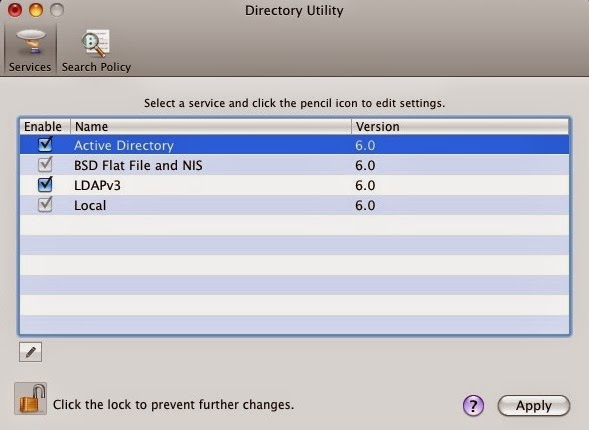
You should now be at the Directory Utility; click the Lock to make changes. Then make sure Active Directory is checked, highlight it, and then click the Pencil to edit this setting.

Here you can enter your domain information and computer ID. For this example the domain is hq.test.us and the computer ID is Mac. The computer ID is the computer name that will show up in Active Directory once the Mac is joined to the domain.

*******Set up Create mobile accounts at login *******
_________________________________________________________________________

If you use a portable computer and can join it to a network account server that lets you have a mobile user account, you get the following benefits:
  • A mobile account provides a home folder on both your computer and a network account server. The two home folders are automatically synchronized whenever you log in when you’re connected to the server’s network.
    The term “portable home directory” refers to the synchronized home folders.
  • The appearance of the desktop and other resources on a portable computer is the same, whether or not you’re connected to the network.
  • You use the same user network name and password when you log in, whether or not you’re connected to the network.
Before you can set up a mobile account, you must join your computer to a network account server that supports mobile accounts.
__________________________________________________________________________


Click the arrow to Show Advanced Options. This gives you 3 extra options you can configure. To keep it simple I usually leave these settings default except for the Administrative section. Click the Administrative button and enter the IP address or the FQDN of your domain controller in the Prefer this domain server section. For this example I used the IP address of my domain controller192.168.1.172. You can also specify groups that are allowed administration privileges.

Now click the Bind button and you will be prompted for credentials. Enter your domain administrator username and password and click OK.
You should see it progress through steps 1-5 as you are authenticated and joined to the domain.

Now you should be joined to the domain and the Bind button changes toUnbind.

Click OK and then click Apply in the Directory Utility window. Then close the Directory Utility. Now you should be back at the Accounts window. Note the green dot and domain name next to Network account server.

Logging In with Windows Credentials on Your Mac

Now you should be able to login to the Mac with your Windows domain credentials. Log off the current user you are logged in with. When you get back to the login screen choose Other.

Now enter your Windows domain credentials.

 
That should get you logged into the computer with your domain credentials. So now what? How do you access the files on the server?
We will need to map drives to the shared folders on the server so you can access the files. From Finder click Go then click Connect to Server. Since Mac uses SMB we need to use this syntax: smb://servername/share then clickConnect.


Note that you will not be prompted for credentials to connect because we are logged in with our domain account. You can also connect to Windows shared folders with the same syntax and a username and password if your Mac is not joined to the domain.

Mac on Windows Domain: Is it Worth it?

Now I bet you’re wondering, is this worth it?
This process is not for the faint of heart and can get tricky depending on your environment. There can be issues with joining Macs to a .local domain and there can also be reverse DNS issues to be aware of. With these things in mind, there are definitely some things to consider before joining your Mac to a Windows domain.
Some may wonder what the benefits of joining s Mac to a Windows domain would bring. It mostly helps with accessing files on your Windows server without authenticating every time. It also helps with user account management and alleviates the need to have separate user accounts on the local Mac computer and on the Windows domain.
In my opinion, if you have a mobile Mac user with a laptop you probably wouldn’t join it to your domain, but would instead authenticate when needed. If you have Mac desktop computers and multiple users logging into them and using them daily, joining them to the domain is probably a better solution. Overall it’s up to you how you want to configure it but hopefully this gives you a good baseline to start with.
What other benefits can you think of for joining a Mac to a Windows domain? What other solutions are there for Windows organizations that use Macs?

2014年7月9日 星期三

AD 批次修改範例

摘錄自 小小役男日記


AD 批次修改使用者的屬性

公司有時候會遇到一些例外狀況,會需要把所有同仁的屬性做修改,比如密碼永久有效(這裡不談資安議題...)等需求,那麼必須該怎麼做呢?
首先,可以先到AD主機去打開命令提示字元,然後使用dsquery及dsmod去修改使用者的屬性,假如我現在要將不能變更密碼選項打勾(圖1是未勾選),

圖1   使用者不能變更密碼未勾選


1個帳號當然可以直接這樣勾一勾就好了,如果是100個,也可以悶著頭勾,但公司有好幾萬個人要怎麼辦呢(本公司就是好幾萬人...)?
所以就要將dsquery 跟 dsmod 合在一起變成一行指令去跑即可,例如:
dsquery user cn=John,ou=infra,ou=it,ou=company,dc=tw,dc=AAA,dc=com | dsmod user -canchpwd no
就會變成圖2了( 上列指令是針對單一使用者帳號做的,如果要針對OU內所有帳號做一樣的設定,只需要把cn=John的參數拿掉就可以了),至於有那些屬性可以修改就看備註囉。。

圖2    使用者不能變更密碼已勾選


備註:
dsmod 說明

描述: 修改目錄中現存的使用者。
語法: dsmod user <UserDN ...> [-upn <UPN>] [-fn <FirstName>]
[-mi <Initial>] [-ln <LastName>] [-display <DisplayName>]
[-fnp <first name phonetic>] [-lnp <last name phonetic>]
[-displayp <display name phonetic>]
[-empid <EmployeeID>] [-pwd {<Password> | *}]
[-desc <Description>] [-office <Office>] [-tel <Phone#>]
[-email <Email>] [-hometel <HomePhone#>] [-pager <Pager#>]
[-mobile <CellPhone#>] [-fax <Fax#>] [-iptel <IPPhone#>]
[-webpg <WebPage>] [-title <Title>] [-dept <Department>]
[-company <Company>] [-mgr <Manager>] [-hmdir <HomeDir>]
[-hmdrv <DriveLtr>:] [-profile <ProfilePath>]
[-loscr <ScriptPath>] [-mustchpwd {yes | no}]
[-canchpwd {yes | no}] [-reversiblepwd {yes | no}]
[-pwdneverexpires {yes | no}]
[-acctexpires <NumDays>] [-disabled {yes | no}]
[{-s <Server> | -d <Domain>}] [-u <UserName>]
[-p {<Password> | *}] [-c] [-q] [{-uc | -uco | -uci}]
參數:
值 描述
<UserDN ...> 必要/stdin。要修改之一或多位使用者的辨別名稱 (DN)。
如果省略目標物件,則會從標準輸入 (stdin) 取得,支援
將另一個命令的輸出傳送為這個命令的輸入。
-upn <UPN> 將 UPN 值設定為 <UPN>。
-fn <FirstName> 將使用者名字設定為 <FirstName>。
-mi <Initial> 將使用者名字簡寫設定為 <Initial>。
-ln <LastName> 將使用者姓氏設定為 <LastName>。
-display <DisplayName> 將使用者顯示名稱設定為 <DisplayName>。
-fnp <FirstNamePhonetic> 將使用者注音標示名字設定為 <FirstNamePhonetic>。
-lnp <LastNamePhonetic> 將使用者注音標示姓氏設定為 <LastNamePhonetic>。
-displayp <DisplayNamePhonetic> 將使用者注音標示顯示名稱設定為 <DisplayNamePhonetic>。
-empid <EmployeeID> 將使用者員工識別碼設定為 <EmployeeID>。
-pwd {<Password> | *} 將使用者密碼重設為 <Password>。如果輸入 *,則會提示
您輸入密碼。
-desc <Description> 將使用者描述設定為 <Description>。
-office <Office> 將使用者辦公室位置設定為 <Office>。
-tel <Phone#> 將使用者電話號碼設定為 <Phone#>。
-email <Email> 將使用者電子郵件地址設定為 <Email>。
-hometel <HomePhone#> 將使用者住家電話號碼設定為 <HomePhone#>。
-pager <Pager#> 將使用者呼叫器號碼設定為 <Pager#>。
-mobile <CellPhone#> 將使用者行動電話號碼設定為 <CellPhone#>。
-fax <Fax#> 將使用者傳真號碼設定為 <Fax#>。
-iptel <IPPhone#> 將使用者 IP 電話號碼設定為 <IPPhone#>。
-webpg <WebPage> 將使用者網頁 URL 設定為 <WebPage>。
-title <Title> 將使用者職稱設定為 <Title>。
-dept <Department> 將使用者部門設定為 <Department>。
-company <Company> 將使用者公司資訊設定為 <Company>。
-mgr <Manager> 將使用者主管設定為 <Manager>。
-hmdir <HomeDir> 將使用者主目錄設定為 <HomeDir>。如果這是 UNC
路徑,則也必須透過 -hmdrv 指定對應到這個路徑的磁碟機
代號。
-hmdrv <DriveLtr>: 將使用者主磁碟機代號設定為 <DriveLtr>:
-profile <ProfilePath> 將使用者的設定檔路徑設定為 <ProfilePath>。
-loscr <ScriptPath> 將使用者的登入指令檔路徑設定為 <ScriptPath>。
-mustchpwd {yes | no} 設定使用者是否必須在下次登入時變更密碼 (yes 或 no)。
-canchpwd {yes | no} 設定使用者是否可以變更密碼 (yes 或 no)。
如果 -mustchpwd 設定為 "yes",則這個設定應該為 "yes"。
-reversiblepwd {yes | no}
設定是否應該使用可反轉的加密來存放使用者密碼 (yes 或
no)。
-pwdneverexpires {yes | no}
設定使用者密碼是否永久有效 (yes 或 no)。
-acctexpires <NumDays> 將使用者帳戶設定成從今天算起的 <NumDays> 天後到期。
值為 0 表示帳戶會在今天結束前到期。
正數值表示將到期日設定在未來。
負數值表示將到期日設定在過去。
字串值 "never" 表示帳戶永久有效。
-disabled {yes | no} 設定使用者帳戶是否已停用 (yes 或 no)。
{-s <Server> | -d <Domain>}
-s <Server> 會連線到名稱為 <Server> 的 AD DC/LDS
執行個體。
-d <Domain> 會連線到網域 <Domain> 內的 AD DC。
預設值: 登入網域中的 AD DC。
-u <UserName> 以 <UserName> 身分連線。預設值: 登入的使用者。
使用者名稱可以是: 使用者名稱、網域\使用者名稱
或使用者主要名稱 (UPN)。
-p <Password> 使用者 <UserName> 的密碼。如果輸入 *,則會提示
您輸入密碼。
-c 連續操作模式: 指定多個目標物件時,會報告錯誤,
但是會繼續處理引數清單中的下一個物件。如果未指定
這個選項,命令會在第一次發生錯誤時結束。
-q 安靜模式: 不在標準輸出顯示所有輸出。
{-uc | -uco | -uci} -uc 指定輸出到管道或從管道輸入時使用 Unicode 格式。
-uco 指定輸出到管道或檔案時使用 Unicode 格式。
-uci 指定從管道或檔案輸入時使用 Unicode 格式。
備註:
如果輸入的值含有空格,請使用引號括住該文字 (例如,
"CN=John Smith,CN=Users,DC=microsoft,DC=com")。
如果輸入多個值,則必須用空格隔開每個值 (例如,辨別名稱的清單)。
特殊權杖 $username$ (區分大小寫) 可以用來將 SAM 帳戶名稱當成
-webpg、-profile、-hmdir 及 -email 等參數的值。
例如,如果目標使用者 DN 是 CN=Jane Doe,CN=users,CN=microsoft,CN=com,
而 SAM 帳戶名稱屬性是 "janed",則 -hmdir 參數可以有下列替代項目:
-hmdir \users\$username$\home
-hmdir 參數的值會修改為下列值:
- hmdir \users\janed\home
範例:
重設使用者的密碼:
dsmod user "CN=John Doe,CN=Users,DC=microsoft,DC=com"
-pwd A1b2C3d4 -mustchpwd yes
將多個使用者密碼重設成共用密碼,並強制他們在下次登入時變更其密碼:
dsmod user "CN=John Doe,CN=Users,DC=microsoft,DC=com"
"CN=Jane Doe,CN=Users,DC=microsoft,DC=com" -pwd A1b2C3d4 -mustchpwd yes
同時啟用多個使用者帳戶:
dsmod user "CN=John Doe,CN=Users,DC=microsoft,DC=com"
"CN=Jane Doe,CN=Users,DC=microsoft,DC=com" -disabled yes
使用 $username$ 權杖,將多位使用者的設定檔路徑修改成共用路徑:
dsmod user "CN=John Doe,CN=Users,DC=microsoft,DC=com"
"CN=Jane Doe,CN=Users,DC=microsoft,DC=com" -profile \users\$username$\profile

請參閱:
dsmod computer /? - 修改目錄中現有電腦的說明。
dsmod contact /? - 修改目錄中現有連絡人的說明。
dsmod group /? - 修改目錄中現有群組的說明。
dsmod ou /? - 修改目錄中現有組織單位的說明。
dsmod server /? - 修改目錄中現有 AD DC/LDS 執行個體的說明。
dsmod user /? - 修改目錄中現有使用者的說明。
dsmod quota /? - 修改目錄中現有配額規格的說明。
dsmod partition /? - 修改目錄中現有分割的說明。
目錄服務命令列工具說明:
dsadd /? - 新增物件的說明。
dsget /? - 顯示物件的說明。
dsmod /? - 修改物件的說明。
dsmove /? - 移動物件的說明。
dsquery /? - 尋找與搜尋準則相符物件的說明。
dsrm /? - 刪除物件的說明。